23 January 2024
Tech & Tools
By IAN FAILES and MARIJN EKEN


Visual effects artists already know there are often many ways you can pull off a particular shot via different filming methods and with different tools and techniques. That’s certainly the case with compositing, where several pieces of software and compositing workflows can be used.
Here, visual effects artist Marijn Eken – who has worked as a compositor at studios including DNEG, Scanline VFX and RISE | Visual Effects Studios, and currently teaches at the Netherlands Film Academy – explains how he might tackle compositing of the same shot in three separate packages. These are Foundry’s Nuke, Blackmagic Design’s Fusion (inside DaVinci Resolve) and Adobe After Effects, arguably the three most accessible compositing tools.
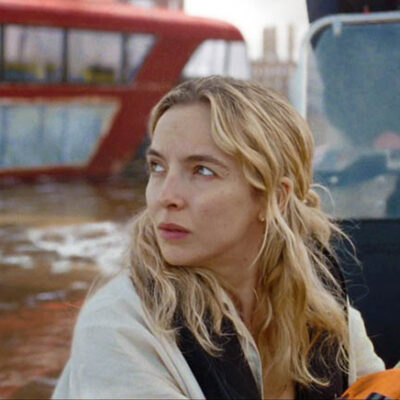
The elements supplied to Eken were stock footage of a woman pinch-zooming a greenscreen and the marker-covered tablet, and a photograph of the space shuttle Endeavour taken at California Science Center, with the idea being that she would be zooming into an area of the photograph on the device.

In coming up with a methodology for approaching this relatively simple composite in the three different packages, Eken generally followed these steps:
1. Track the four corners.
2. Use the corner pin method to composite the image over the screen.
3. Track the two fingers on the screen and use that to position and zoom the image.
4. Apply grading on the inserted image to match the black levels and white point.
5. Use the greenscreen and some roto to separate the hand and composite it on top.
These overall steps represent just one compositor’s view about how the elements could be composited together, along with some of the nuances involved in each of these common compositing tools.
Step 1. Tracking
In general, for accuracy, it’s best to use as large an area as possible for tracking. Here, the hand comes across the screen at some point and obscures part of the screen and the lower right corner, so we need to work around that. For Nuke and Fusion, we can use a Planar Tracker. It’ll use a large surface area to track, and even though the lower right corner is obscured at some point, we can get an accurate location for that corner at all times. See below for what works best for After Effects.
Nuke: We use the PlanarTracker node to create a roto shape that covers as much area as possible, without using any of the surface that is later covered by the hand. Just pressing the Track Forward button was enough to make this work in one go.
Fusion: We use the Planar Tracker which starts in Track mode and directly allows us to draw a roto shape for the area we want to track. After the tracking is done, you have to switch the Tool’s Operation Mode to Corner Pin. Then you’ll get a rectangle that you can modify to place the corners in the correct location on one frame, and then it’ll follow the screen in subsequent frames.
After Effects: You could do a planar tracker, but it involves going to the included Mocha application. That’s a bit involved, so for this demonstration I opted to stick with the built-in tools. That means we’re doing a perspective corner pin track using four trackers. Three of those we can place on the actual corners, but the bottom right one is obscured by the hand at some point, so we place it on the closest tracking marker on the screen. That’s not ideal, since we won’t be tracking the actual corner of the screen, and this will cause inaccuracies with the position of that corner. With a control-drag we can position the corner pin point on the actual corner.
Step 2. Corner pin
Nuke: We can select our PlanarTracker and choose Export > CornerPin2D (absolute). This will create a CornerPin2D node that does the work for us of warping the space shuttle image to match the screen. Our tracking data was created on an image of 1920 x 1080 (our source footage), but the image to be inserted has a resolution of 3024 x 4032. To make the corner pin work, we use a Reformat node, to ‘distort’ the space shuttle image into the 1920 x 1080 resolution, before applying the corner pin. Nuke is smart enough to not actually do two transforms back-to-back. It would be scaling the image down two times, which would result in a loss of image quality. Nuke uses what is
called concatenation to gather all the transformations first, and only applies them once at the end. Once we have our properly distorted image, we use a Merge node to composite it on top of our footage.
Fusion: We connect the space shuttle image to the special ‘Corner Pin 1’ input of the Planar Tracker. Fusion takes care of the resolution differences and compositing of the images. In fact, it uses a unique system of always describing coordinates and positions in a range from (0,0) to (1,1). Since the corner pin is warping the (0,0) and (1,1) coordinates (the corners) to the correct screen locations, this always works, regardless of resolution.
After Effects: From the Tracker side panel, we select a Motion Target (our space shuttle image layer that we brought into the composition) and press Apply. This creates a Corner Pin effect on the space shuttle layer, with animated corner points, which squeezes the image to fit inside the four corners. Resolution differences are taken care of by After Effects.
Step 3. Finger tracking
The hand moves over the screen and makes a pinch motion. To translate that action into actually zooming into the content was the most difficult part of this exercise. I took the easiest approach in Nuke, which worked straight away. The other packages, though, couldn’t do the same, so I had to come up with some tricks with expressions, which are similar between Fusion and After Effects, but not completely.
Nuke: I duplicated the CornerPin node that we already had and turned on the ‘invert’ checkbox. This inverts the corner pin operation, filling our screen with the tablet’s screen. The next step was to create a normal tracker node (not the PlanarTracker) and track the two finger tips moving apart. A reference frame had to be chosen (frame 40) to be the frame at which no zooming or translation would be in effect.
By setting the tracker transform mode to ‘match-move,’ and ticking the Translate and Scale options (not the Rotation), the space shuttle image would follow the scale (distance between the fingers) and position (average of the two fingertips). By inserting the Tracker node before the CornerPin2D node, this assured the scaling would be applied in the correct ‘domain.’ Because the image is enlarged by zooming in, it was necessary to add a Crop node to remove the edges of the image that should not be visible
beyond the screen of the tablet.
Fusion: Using a Tracker Tool, we track the two fingertips. After the MediaIn Tool (which reads in the space shuttle image), we place a Transform Tool that we use to move the image around to position it where we need it. We also zoom in a little bit. Next is another Transform Tool we called Scale. This has an expression to do the scaling based on the movement of the fingers. We need to calculate the distance between the two points using good old Pythagoras.
We divide this number by the smallest distance when the fingers first touch the screen. That way the scale will be 1 at that point, and scale up accordingly with the distance between the fingers. That takes care of the zooming, but not the position yet.
To move the space shuttle image with the average position between the fingers, we need to do the following math on another Transform Tool, which we’ll call TrackAverage.
So we basically add the coordinates of the two fingertips and divide by two to get the average, but because the tracked footage has a resolution of 1920 x 1080 and the space shuttle image is a different resolution (3024 x 4032), we need to scale by the fractions between those x and y resolutions.
After Effects: To apply the zooming of the image, we need to do this before the corner pin is applied, otherwise we’d already have lost resolution if zooming in after the corner pin effect. To do this effectively, we have to Pre-Compose the image layer. Inside this new composition we need to create an expression on the Scale parameter of the layer. This expression is quite simple. It takes the two tracked fingertip points and calculates the distance between them with the ‘length()’ function. This distance is a number in pixels, so we have to ‘convert’ that into a scale. We determine that the smallest distance is 63.6 pixels (when the fingers touch the screen). If we divide by that number, the scale will be 100% when the fingers touch the screen. When they move away from each other, the scale will increase exactly by the right amount.
However, this doesn’t take care of the position just yet. When the fingers move apart, the position in between the fingers is used to move the image around. To mimic that, we create an expression on the Position parameter of the layer in the main composition. It takes the original position and adds some motion on top. We take the average of the two tracked fingers by adding the two tracked positions and dividing by two. Adding this would create an offset, though, so we counteract that with a Track Offset parameter so that at the moment the fingers touch the screen, no extra motion is applied.
Step 4. Grading
To better integrate the space shuttle image into the final composite, we need to match the color of the image to the main footage.
Nuke: We can use a Grade node directly after the Read node to control the color of the image that is inserted. We can select the darkest black for the ‘blackpoint’ and the brightest white for the ‘whitepoint’ in the space shuttle image. If we then select the darkest black in our footage for the ‘lift’ parameter and the brightest white for our ‘gain’ parameter, Nuke matches the blackpoint and whitepoint. This does need some manual tweaking, but it’s a starting point. To illustrate what this does, it’s hard to see
without over-exaggerating the effect. By pushing the gain up on the viewer, you can see a before and after of what the Grade node does.
Fusion: The process is similar to Nuke, but we don’t have the blackpoint/whitepoint feature. Using the Color Gain Tool, we can dial in the values by eye. But if we want to judge the darker levels, we need to use a Color Correct node to increase the gain, because the viewer doesn’t have a slider to do that (like Nuke and After Effects do). It’s important to check the ‘Pre-Divide/Post-Multiply’ option; otherwise, the lifting of the blacks will lift areas outside of our image too.


After Effects: On the layer that holds our image, we can apply a ‘Levels (Individual Controls)’ effect to change the color. It does have a similar feature as Nuke with the ‘Input Black’ and ‘Output Black’ parameters, but you can’t use a color picker with those, so it makes less sense to use them. So I just did it by eye in this case.
Step 5. Greenscreen
We now basically have everything working correctly, but our image covers the hand, so we need to fix that. There are multiple ways to achieve this, but the easiest, and I think best way, is to just layer the hand on top. Luckily we have the green to help us with that, otherwise we would have to use rotoscoping to do it. But sadly, there are markers on the screen, so we still need a little bit of roto.
Nuke: For this example we’ll just use a Keylight node. Simply select the Screen Color and set the view to Final Result. With the Roto node we create a very simple shape around the hand that only needs to be accurate around the thumb area, where the tracking marker is. We Merge the result over the image, using the Mask input to limit the effect.
Fusion: For the keying we’ll use an Ultra Keyer Tool. Using the color picker to select the Background Color quite quickly gives us a satisfying result, after tweaking a few values. The UltraKeyer has a separate Garbage Matte input that we can use with the B-spline Tool to mask out a rough roto for the hand with more accuracy at the thumb, where we need it. Using the Merge Tool, we combine this isolated hand with the image we had.
After Effects: We duplicate our footage layer to composite our keyed hand on top. Then we apply the Keylight effect and select the Screen Color. On this layer we also create a Mask, for which we have to set the Mode to None. The mask is used inside the Keylight effect by selecting it as an Outside Mask and checking the Invert
checkbox.